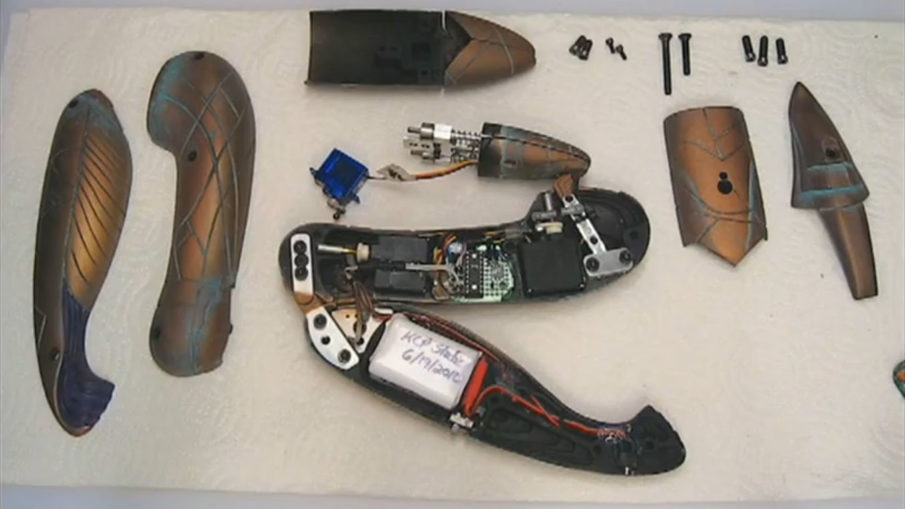
Introduced in the first season of Stargate SG-1, the Zat’nik’tel prop underwent several design changes throughout the series. The original working props were operated by compressed air, and were limited to only a pop-up effect. While this design was sufficient for some scenes, it did not allow for the actors to be shown deactivating a Zat. The studio prop builders fixed this problem by redesigning the Zat gun to be controlled by electronics capable of manipulating the prop in more ways.
So how do you build a working Zat Gun? With servos of course! The studio prop contains a circuit board that controls three micro servos, and a solenoid. Two servos for the opening and closing of the Zat itself, and a third for the opening and closing of the emitter tip (the business end of the Zat). The single solenoid controls the recoil (the top of the Zat actually bounces backward and forward when fired).
The original parts used in the functional Zat Guns included:
- 2x Hitec HS-82MG micro servos for opening/closing the Zat
- 1x Hitec H2-55 micro servo for the emitter
- 6x 1.2v 750Ma AAA NiMH (Nickel–metal hydride)
The Zat gun actually has two separate buttons. A top button initiates the opening/closing servos, pivoting the shell pieces on two pivot points with micro bearings. A bottom button is used to fire the Zat, and activates the solenoid which causes the recoil effect.
As you will see in the photos, the Zat gun shells were made in multiple parts to allow for the movement effects. At least 11 separate shell pieces are used.
Overall this is a highly complex prop when compared to the static closed or static open Zat guns used in some scenes.
Update, 2017: We have learned that a functional replica of the Zat Gun is in the works. We will share more information when we have it.
Special thanks to Kenneth Palkow of Quantum Mechanix, and VIP Fan Auctions for their resources that made this article possible.


Leave a Reply